Troubleshooting

Troubleshooting - SOTO Outdoors

Micro Regulator & WindMaster Stoves

How to clean the igniter after pot boil-over

If food boils over and liquid spills out onto the igniter, spray the igniter with WD-40 or CRC after the hike and perhaps put a couple drops of machine oil or baby oil on the igniter before stowing. This should prevent the springs from rusting. (submitted by a Scott S., a SOTO user.)

Food spills over and lands in the burner head
  1. Prepare warm water in pot. When the stove has cooled:
  2. Turn the WindMaster upside down, submerge the burner head in the warm water and soak for 10-20 ninutes
  3. With a soft toothbrush or similar non-coarse brush, gently remove debris from the head of the stove.
  4. Warning: Never submerge the regulator or base of the stove in water.
  5. After cleaning, remove the burner head from the water and dry well with a soft cloth.
  6. When completely dry, install fuel canister to stove and test the flame.
  7. If the flame is red-orange, repeat the cleaning process.

*Please note that inside the burner head there is a metal mesh sheet sandwiched between the base plate and the top metal layer. Be careful not to damage the metal mesh.


Troubleshooting - SOTO Outdoors
How to repair the Stealth Igniter
See SOTO’s YouTube video Troubleshooting - SOTO Outdoors 
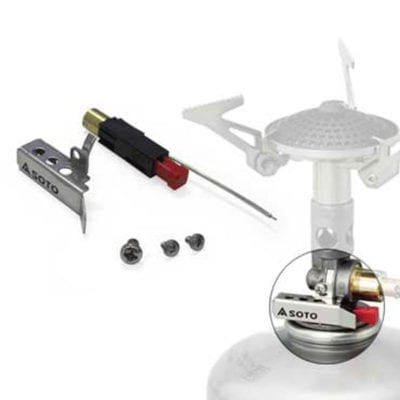
“How to repair a Stealth Igniter”
Troubleshooting - SOTO Outdoors

Muka Stove

Fuel leak observed while using the unit in a severely cold environment.
Long exposure to severely cold temperatures may cause O-rings to shrink in volume, thereby creating a fuel leak. Never use the stove/Smart Pump/Wide Mouth Bottle under -20 degrees C(-4 degrees F) environment.
Unable to build up pressure inside the Wide Mouth Bottle in severely cold ambiant temperatures.
Refer to the assembly drawing : Under a severely cold environment, (16) the Replaceable Pump Shaft Gasket may be reduced in volume, creating a loose connection inside the Pump Unit, causing the air to leak. Take (14) the Pump Shaft Unit from (18) Pump Unit. Attempt to expose (16) Replaceable Pump Shaft Gasket to a heat source such as human body to increase temperature of the unit.
Generator unit leaks liquid fuel or an unusually large flare of fire noticed when starting the unit.
Cause 1: The pressure inside the bottle may not be adequate.
Solution: Pump the Wide Mouth Bottle until red line on the Pressure Indicator is observed.

Cause 2: It could stem from over-filling the Wide Mouth Bottle with liquid fuel.
Solution: Check fuel volume and make sure that it does not exceed the “DO NOT FILL ABOVE THIS LINE” mark. If exceeded, pour out some to adjust the volume.

Cause 3: Heat source was not available at ignition.
Solution: Always prepare a heat source (fire source) at ignition and place it over the burner head before turning the Control Dial (CD) to the “START” position. Never use a flick type of ignition device to light the stove. When turning the CD to the “START” position, the system will first release the air, taking only a few seconds. After the initial air is released, the atomized mixture of fuel and air will be released.

Cause 4: The Wide Mouth Bottle is not positioned correctly and/or placed at a slope.
Solution: Always place the pump/bottle units on the ground so that the Control Dial (CD) will be in an upright position. See illustration

Cause 5: Switching of “Start” to “RUN” position was too fast.
Solution: Wait for 10 seconds to switch from “START” to “RUN” position after the initial ignition. The flame will change from orange to blue indicating that the flame has stabilized.

Cause 6: Generator Unit may be deformed due to excessive force being applied to the Unit.
Solution: Replace Generator Unit immediately.
A leaping tall flame about 30 to 50 cm (12-20 inches) when stove is initially ignited.
A tall flame is normally observed and designed to heat the generator quickly, thereby stabilizing the flame.
Generator unit rattles.
Rattling of the Generator Unit is normal. The system is designed to expand when heat from the flame expands the Generator Unit.
Stove is not engaging with the Control Dial.
The Control Dial (CD) is in the depressed or “LOCKED” position, thus disengaged from the functions.Pull the CD upward to engage the various functions.
Generator Unit is not asymmetric.
It is designed to be positioned at an angle for optimal atomized fuel projectile. See Illustration
Generator Unit is made of a soft metal. Never apply unnecessary force or hit with a foreign object. Never use the stove with a damaged Generator Unit. If Generator Unit becomes damaged, bent or cracked, replace immediately.
The majority of liquid stoves on the market require changing of the jet as part of the maintenance program. Why does the entire Generator/Jet unit need to be replaced for maintenance of the Muka stove?
The Muka stove is uniquely engineered to eliminate pre-heating. The construction and integrity of the generator and jet are specifically designed to create a flame that can be ignited without cumbersome pre-heating of the generator. SOTO has conducted numerous lab tests and has concluded that the best way to service the clogged jet is to simply replace it with the entire Generator/Jet unit. There are various reasons why we recommend this method, but the main reason is to avoid recurrent clogging of the jet. Replacement of only the jet results in an incomplete cleaning of the unit. This is why we recommend replacing the entire Generator/Jet unit.
The Control Dial (CD) is at the "START" position but no fuel is dispensed.
Cause 1: The hose unit may not be completely inserted at the connection point.
Solution: Connect the hose to the Smart Pump completely.

Cause 2:The tube may be deformed, or not submerged in the fuel.
Solution: Check the tube at the Smart Pump. If the tube is twisted, readjust the direction of the tube.

Cause 3: The fuel passage or Generator Unit may be clogged.
Solution: Replace the Generator Unit. If not improved, replace the hose unit. If still not improved, contact SOTO or the retailer from which the unit was purchased.
Flame is too small.
Cause 1: Under pressurized Wide Mouth Bottle.
Solution: Pump and add more pressure to the Wide Mouth Bottle.

Cause 2: Control Dial is left on the “Start” position.
Solution: Optimize pressurization of the Wide Mouth Bottle after turning the CD to the “RUN” position.

Cause 3: Check the level of the liquid fuel in the Wide Mouth Bottle.
Solution: When the fuel level is low, add more designated liquid fuel to the Wide Mouth Bottle.

Cause 4: Generator may be clogged and unable to produce an adequate flame.
Solution: Exchange the old Generator Unit with a new one.

Cause 5: Tried all above but does not improve
Solution: Contact SOTO or the dealer from which the unit was purchased.
Unstable and yellow/orange flame.
Cause 1: Excess pressure may cause a leaping red flame at start up.
Solution: Release over pressurized air from the Wide Mouth Bottle. See following “Releasing of overly pressurized air from the Wide Mouth Bottle”

Cause 2: If a Pro Windscreen is being used, lack of adequate oxygen and/or a strong wind may cause this phenomenon.
Solution: Open the Vari-Vent(s) to supply the unit with additional oxygen.

Cause 3: The vent on the stove body may draw in the flame, causing the stove to produce a red flame.
Solution: Turn the stove to a different position to compensate for the wind’s direction.

Cause 4: Generator Unit may be damaged.
Solution: Replace Generator Unit immediately.
Releasing overly pressurized air from the Wide Mouth Bottle.
Connect the Smart Pump/Wide Mouth to the stove unit. Turn the Control Dial (CD) to the “AIR” position by rotating the CD. When turning the CD to the “AIR” position, the CD must be in the depressed position. If this procedure is not observed, undesired leaking of liquid fuel will occur. Once the CD is in the “AIR” position, pull it upward.
Avoid over-pressurizing the Wide Mouth Bottle.
Observe the red line on the Pressure Indicator located at the Smart Pump when pressurizing. When the Red Line appears, stop pumping.
Hose has a leak.
The hose may have been damaged. Never use the stove when a leak in the hose has been discovered. Contact SOTO or the dealer from which the unit was purchased.
Liquid fuel leaks from the hose connection to the stove.
Cause 1: Generator Joint is loosely attached.
Solution: Tighten the Generator Joint.

Cause 1: O-rings used at the connection may be damaged.
Solution: Contact SOTO or the dealer from which the unit was purchased.
Liquid fuel leaks from the connection between the hose and Smart Pump.
The connecting parts may be damaged or soiled with dirt. Never use the stove when a leaky connection has been discovered. Contact SOTO or the dealer from which the unit was purchased.
Liquid fuel leaks near the Control Dial.
O-ring engaging with the Control Dial may be damaged. Never use the unit when a leak is discovered. Contact SOTO or the dealer from which the unit was purchased.
Liquid fuel leaks near the Pressure Indicator and/or at the Pump Shaft Unit.
O-rings may be damaged or deformed. When a leak is observed, stop using the unit. Contact SOTO or the retailer from which the unit was purchased.
Liquid fuel leaks from the connection between the Smart Pump and the Wide Mouth Bottle.
Cause 1: The Smart Pump is loosely attached causing the fuel to leak.
Solution: Tighten the Smart Pump.

Cause 2: O-ring is old and has lost its elasticity or damaged.
Solution: Replace the O-ring.

Cause 3: The lip of the Wide Mouth Bottle is damaged, causing the leak.
Solution: Change the Wide Mouth Bottle.
Pot Supports no longer function smoothly when folding and unfolding.
Cause: Heat from the flame may burn the surface of the pot supports, causing rigidness when folding/unfolding the pot supports.
Solution: Apply a small amount of grease, included in the Maintenance Kit, at the joint of each pot support. If not improved, use a hexagonal wrench to disassemble each pot support, apply a small amount of grease at the joint, then reassemble unit.
Pressure Indicator does not function smoothly.
The fuel level may be low. Pour more liquid fuel into the Wide Mouth Bottle. Be careful not to exceed the “DO NOT FILL ABOVE THIS LINE” mark.
Unable to build up pressure inside the Wide Mouth Bottle, despite pumping.
Cause 1: Check the Replicable Pump Shaft Gasket.
Solution: Be sure to check that it is positioned correctly.

Cause 2: Replaceable Pump Shaft Gasket is damaged.
Solution: Replace the old Gasket with a new one.

Cause 3: The Replaceable Pump Shaft Gasket is soiled and dirty.
Solution: Clean the unit thoroughly.

Cause 4: Lack of adequate grease.
Solution: Apply a small amount of grease according to the Manual Instructions.

Cause 5: Inside wall of the Pump Unit’s surface is damaged.
Solution: Replace the entire Smart Pump if the surface of inside wall of the Pump Unit is scratched or damaged. Contact SOTO or the dealer from which the unit was purchased.
Flame does not extinguish immediately after turning the Control Dial to the "STOP" position.
Residual liquid fuel may cause a delay in extinguishing the flame. When extinguishing the flame, turn the Control Dial (CD) first to the “AIR” position. Wait until all residual liquid fuel is burned off before setting the CD to “STOP” position.
Flame does not extinguish immediately after turning the Control Dial to the "LOCK" position and setting the Control Dial to the "LOCK" position.
O-rings may be damaged or deformed. Stop using the unit. Contact SOTO or the dealer from which the unit was purchased.
Can white and unleaded gasoline be mixed for the Muka stove?
White and unleaded gasoline may be mixed. The use or mixing of any liquid fuel, other than white and/or unleaded gasoline is strictly prohibited. Use of such prohibited fuel will void the warranty. Use of prohibited liquid fuel will certainly be a cause for clogging of the jet located at the end of the Generator Unit.
Can the Smart Pump be stowed in the Wide Mouth Bottle?
Extended exposure of the Smart Pump to liquid fuel may affect the material adversely. When stowing the Smart Pump, unscrew the pump from the Wide Mouth Bottle. Then thoroughly clean pump, removing any liquid fuel. Dry the unit and stow in a dry area.
Can the Smart Pump be left in the Wide Mouth Bottle when transporting the stove?
It is fine to do so. When the Smart Pump is stowed for a long period of time, it must be disengaged from the Wide Mouth Bottle.
The Wide Mouth Bottle is dirty.
Dust, dirt, and sand will affect performance of the stove and will cause clogging of the jet. When the Wide Mouth Bottle is soiled with such materials, discharge the liquid fuel. Then clean the bottle thoroughly before further use. It is essential that the inside and lip of the Wide Mouth Bottle remain free of debris.
Hose connections are soiled with sand and dust.
Dust, dirt, and sand will affect performance of the stove and will cause clogging of the jet. Debris that has soiled the connection will travel through the hose unit and eventually clog the jet located at the end of the Generator Unit.
SOTO Outdoors

Want to know when our new items are coming out?

Share your email address for product updates and special promotions (we will NEVER share this with anyone!)

Thank you for sharing! Come back and visit us again soon.